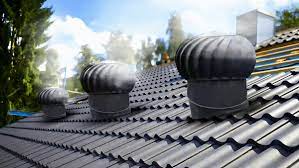
In the realm of home maintenance, the whirlybird stands as a silent sentinel, tirelessly working to ventilate and protect your home from the damaging effects of trapped heat and moisture. Yet, like all components of a home, it is not immune to wear and tear. For the handy homeowner, undertaking a DIY whirlybird repair can be a rewarding challenge that not only ensures the continued efficiency of this crucial ventilation device but also contributes to broader roof maintenance efforts, helping to prevent issues such as a leaking roof. This guide delves into the essential tips and tricks for successfully repairing a whirlybird, while also touching on the complementary tasks of roof painting and maintenance, ensuring a holistic approach to roof care.
Understanding Whirlybird Mechanics
The first step in any repair endeavor is to gain a thorough understanding of the device you’re working with. Whirlybirds, with their spinning turbines, operate on the principle of convection, drawing up warm air from inside the attic to be replaced by cooler air from outside. Familiarizing yourself with the components of your whirlybird, such as the turbine, bearings, and base, is crucial for diagnosing issues and planning your repair strategy.
Diagnosing Common Whirlybird Issues
Common signs that your whirlybird may need attention include unusual noises, decreased spinning efficiency, or visible rust and damage. Noises can often be attributed to worn bearings or misalignment, while a lack of spinning might indicate an obstruction or a problem with the dome. Visual inspections can help identify these issues, setting the stage for the repairs needed.
Repairing or Replacing Worn Parts
Once you’ve identified the issue with your whirlybird, the next step is to decide whether a repair or replacement is necessary. Worn bearings are a common culprit behind a noisy or non-spinning whirlybird and can often be replaced by the homeowner. If the damage is more extensive, or if rust has compromised the integrity of the turbine or base, replacing the entire unit might be the most effective solution.
Sealing and Waterproofing
A crucial aspect of whirlybird repair is ensuring that the unit is properly sealed and waterproofed upon reinstallation. This step is vital for preventing water ingress, which can contribute to a leaking roof. Using high-quality sealants around the base of the whirlybird can help maintain the waterproof integrity of your roof, safeguarding against potential leaks.
Complementary Roof Maintenance
While repairing your whirlybird, it’s an opportune time to conduct other roof maintenance tasks, such as roof painting. A fresh coat of paint not only enhances the aesthetic appeal of your home but can also provide an additional layer of protection against the elements, further reducing the risk of a leaking roof. Ensuring that your roof is in good repair, with clean, functional gutters and downspouts, complements the work you’ve done on your whirlybird, providing comprehensive protection for your home.
DIY whirlybird repair is a manageable task for the handy homeowner, offering an opportunity to extend the life of this vital ventilation component while contributing to the overall health of your roof. By understanding the mechanics of the whirlybird, diagnosing and addressing common issues, and ensuring proper sealing and waterproofing, you can maintain the efficiency and integrity of your roof’s ventilation system. Coupled with additional maintenance efforts such as roof painting, these DIY repairs can significantly enhance the longevity and performance of your roof, keeping your home comfortable, dry, and well-ventilated for years to come.
The Silent Guardians: Redefining Whirlybird Repairs
Whirlybirds, often unnoticed atop our roofs, serve as silent guardians against the detrimental effects of heat and moisture buildup within our homes. Their role is pivotal in maintaining a balanced attic environment, which in turn contributes to the overall health of the roof and the comfort of the living spaces below. However, like any component exposed to the elements, whirlybirds are susceptible to wear and damage, necessitating timely repairs to continue their protective function. This necessity becomes even more critical when considering the broader context of roof maintenance, where issues such as a leaking roof can lead to significant damage and costly repairs. In conjunction with other preventative measures like roof painting, maintaining and repairing whirlybirds is essential in upholding the integrity and functionality of our homes’ roofing systems. This exploration delves into the innovative approaches and best practices in whirlybird repairs, emphasizing their integral role in the larger scheme of roof restoration and preservation.
Innovations in Whirlybird Repair Techniques
The field of whirlybird repairs has seen remarkable advancements, driven by a deeper understanding of their function and the development of more durable materials and designs. Modern repair techniques focus not only on restoring the whirlybird to its original condition but also on enhancing its efficiency and longevity. This might involve the use of advanced lubricants for smoother operation, the replacement of traditional bearings with more durable alternatives, or the application of rust-resistant coatings to combat the effects of weather exposure.
Addressing the Challenge of Leaking Roofs
A leaking roof can compromise the structural integrity of a home, making the maintenance of roof-mounted devices like whirlybirds all the more important. Effective whirlybird repairs play a preventative role in this context, ensuring that these ventilators continue to remove moisture-laden air from the attic space, thereby reducing the risk of condensation and water damage that can contribute to roof leaks. The repair process often includes ensuring a watertight seal at the base of the whirlybird, preventing water ingress that could exacerbate leaking issues.
The Synergy Between Whirlybird Repairs and Roof Painting
Roof painting is not only an aesthetic enhancement but also a protective measure that can extend the life of the roofing material. In the context of whirlybird repairs, there exists a synergistic relationship where both processes contribute to the roof’s overall health. A freshly painted roof can improve the efficiency of whirlybirds by reflecting more heat away from the roof surface, reducing the thermal load and the workload on these ventilators. Conversely, well-maintained whirlybirds ensure that the roof structure remains dry and well-ventilated, providing an ideal surface for roof painting and enhancing the longevity of the paint job.
Best Practices for DIY Whirlybird Maintenance
For the handy homeowner, DIY whirlybird maintenance can be a rewarding task that contributes significantly to the home’s overall roof care regimen. Key practices include regular inspections to check for signs of wear or damage, cleaning to remove debris that may obstruct the ventilator’s movement, and the application of lubricants to ensure smooth operation. It’s also essential to check the integrity of the sealant around the whirlybird’s base, reapplying as necessary to prevent leaks.
The Role of Professionals in Complex Repairs
While many aspects of whirlybird maintenance can be managed by homeowners, certain situations call for the expertise of professionals. Complex repairs, such as those involving structural damage or the integration of whirlybirds into specialized roofing systems, require the knowledge and tools that only experienced roofing contractors can provide. Engaging professionals for these tasks ensures that repairs are conducted safely and effectively, preserving the integrity of the roof and the functionality of the whirlybirds.
Whirlybirds play a crucial but often understated role in the health and efficiency of our homes’ roofing systems. Their maintenance and repair are essential in preventing issues like roof leaks and in ensuring a well-ventilated attic space. Innovations in repair techniques and materials have enhanced the effectiveness and durability of these devices, making them even more valuable in the broader context of roof care. Whether through DIY efforts or with the help of professionals, maintaining these silent guardians is a key aspect of proactive home maintenance, working in tandem with measures like roof painting to protect and preserve our homes against the elements.